Q: Laser Source Fiber Cable Lens Replace & Cleaning Guide
◎ It is imperative that the protective lens are checked for dirt, dust, or damage before you use the fiber connector. It will lead to heavy damage if the laser equipped with dirty or damaged fiber connector.
◎ The use of a dirty fiber connector can result in laser damage, which is not covered by the Maxphotonics' warranty.
◎ The laser will not be covered by the Maxphotonics' warranty if the buyer
External Control Signal Timing Emission Enable Input Laser Modulation Input Power Input Red Light Signal Output Laser Output Chapter 6 Operation Guide 3
change the laser without permission. IMPORTANT :
◎ It is imperative that you wear powder-free rubber gloves during this cleaning procedure! It is hereby stated that damage to the fiber connector can occur due to mishandling, the use of incorrect cleaning procedures, or chemicals for cleaning. This is not covered by the Maxphotonics' warranty.
◎ Ethanol concentration should be above 99.5% during cleaning.
6. Reinstall the inner cap and the outer sleeve onto the cleaned fiber connector. 32 Chapter 6 Operation
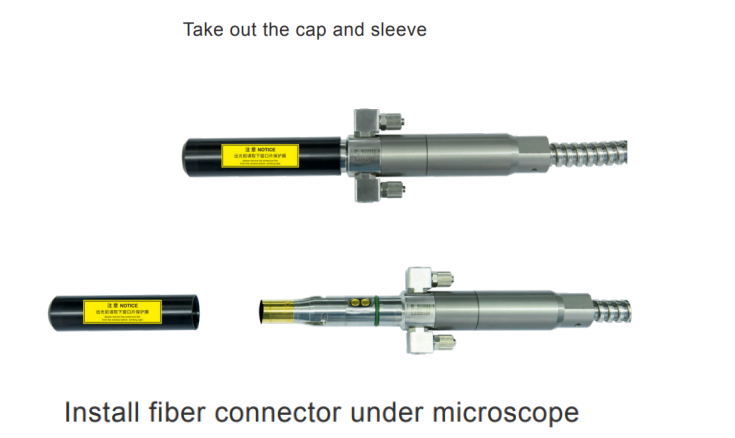
7. Take out the cap and sleeve, then connect the fiber connector with cutting head quickly and fasten them. (Place the cap face down on a clean surface or a lint-free wipe.)
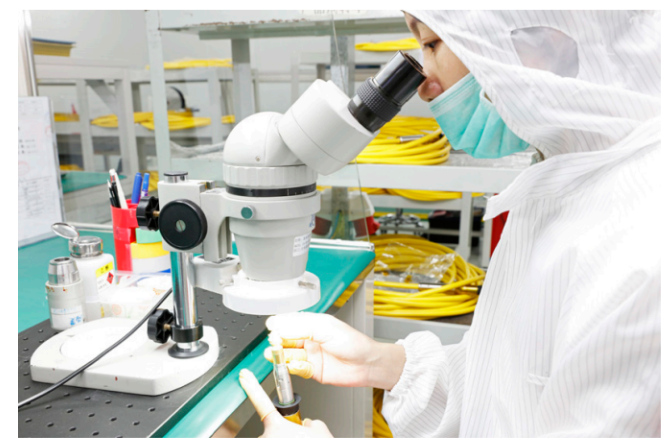
Take out the cap and sleeve Install fiber connector under microscopeC
ha pter 6 O

IMPORTANT:
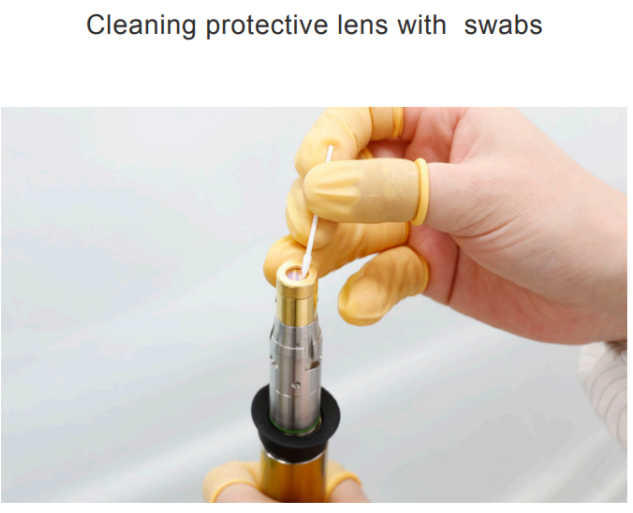
◎ Do not reuse non-woven cotton or cotton swabs.
◎ Do not touch the protective lens of the fiber connector with your fingers.
◎ Do not blow directly with the mouth to protect the surface of the lens from dirt, which may cause new dirt.
◎ Do not touch the tip of the cleaning swab with your fingers.
◎ Please don't forget to clean when you put back the protective cover and sleeve.
◎ When using compressed air, do not blow dirt directly from the front. Use side blowing to avoid dirt from entering the surface.
◎ If the fiber optic connector cannot be replaced immediately on the optical component, cover the tail with a protective cover that has been cleaned with compressed air. Cleaning protective lens with swabs34 Chapter 6 Operation Guide
◎ Make sure that all the electrical connections (including cooling water connections) are connected prior to use. All the connectors must be held steady with screws if possible.
◎ NEVER look directly into the output fiber and make sure that you wear the laser safety eyewear while operating the product.
◎ Make sure all power is removed from the laser when wiring. Starting procedures are as follows:
(6)Place the key switch of the front panel on position "ON".
(7)Press the START button on the front panel. (For external control method)
Q: Training content of laser marking machine
Training content
1. **Laser technology foundation**
- Generation and characteristics of laser
- Working principle of laser marking machine
- Characteristics and application fields of different types of laser marking machines (such as fiber laser marking machine, UV laser marking machine, CO2 laser marking machine, etc.)
2. **Equipment operation**
- Power on, power off and daily operation specifications of laser marking machine
- Use and parameter setting of laser marking software (such as font, size, depth, speed, etc.)
- Graphic design, editing and import skills
- Focus, positioning and adjustment during laser marking
3. **Maintenance**
- Daily cleaning and maintenance methods of laser marking machine
- Maintenance and replacement of key components (such as laser, lens, guide rail, etc.)
- Equipment failure prevention and emergency treatment measures
4. **Safety specifications**
- Laser radiation safety knowledge and protective measures
- Safety precautions during equipment operation
- Emergency response measures
5. **Application practice**
- Application practice of laser marking on different materials (such as metal, non-metal, plastic, etc.)
- Laser marking solutions for specific industries (such as electronics, automobiles, medical, etc.)
- Personalized customization and creative application of laser marking machines
Q: Training methods
Training methods
Local Chinese buyer's workshop training or on site training available. Oversea buyer could come to our factory on site training or via WEB meeting .
1. **Theoretical Explanation** - Manual& Operation Video
- Explanation of theoretical / operation/ assmebly/ installation knowledge through multimedia forms such as manual /PPT and video
2. **Practical Exercises**-On site
- Practical exercises on equipment operation, maintenance and troubleshooting under the guidance of professionals
3. **Remote Control**- Online
-after bought machine if need any assistance with remote control app Teamviewer Or Anydesk for remote assistance
4. **Video Meeting or Online Interactive Q&A**-Online
- With Whatsapp/ Zoom/ Microsoft team to do online assistance with technician support
Q: How to adjust focus distance of laser marking machine
Adjusting the laser focal length is an important skill in the operation of the laser marking machine, which directly affects the marking effect and quality. The following are some commonly used methods for adjusting the laser focal length:
### 1. Continuous light test method
1. **Draw a figure**:
- Draw a square or circle of about one centimeter on the marking software and fill it normally.
2. **Set parameters**:
- Adjust the laser energy to a larger value and use a low frequency as much as possible.
- Check the continuous marking function.
3. **Test focal length**:
- Place a metal business card or other obstruction at the laser projection position on the product surface.
- Continuously emit light for marking, shake the Y-axis up and down until the laser acts on the metal business card with the strongest energy, the clearest sound, and the brightest color, which is the focal length position.
4. **Record distance**:
- Use a ruler to measure the distance from the galvanometer lens to the surface of the object, and record this distance as a fixed value.
- The next time you mark the same object, just adjust the height of the galvanometer to the surface of the object to that value.
### 2. Manual adjustment of focal length
1. **Set parameters**:
- Set appropriate parameters according to the specific requirements of the laser marking machine, such as rate, power, frequency, etc.
- Select the filling method as needed, such as bow filling, filling density and other parameters also need to be set accordingly.
2. **Place sample**:
- Place a thin metal business card or other obstruction on the object to be engraved to help determine the engraving position and as a reference for adjusting the focal length.
3. **Red light assisted focus**:
- Use the red light assisted focus function to adjust the lens distance by manually shaking the adjustment lever.
- Observe the position of the red light spot. When the two red light spots coincide, it is the correct focal length position.
4. **Engrave and adjust**:
- Turn on the engraving function and rotate the roller to adjust the marking height during the engraving process.
- Adjust while engraving until the light spot is the strongest and the buzzing sound is the loudest, then determine the correct focal length.
### 3. Double red light point value method
1. **Hardware configuration**:
- This method requires the device itself to have the hardware configuration of red light positioning.
- Install one or two oblique red lights next to the galvanometer or galvanometer.
2. **Adjust focal length**:
- Using the principle of right triangle, find the other right angle side of the focal length surface through a fixed right angle side and two overlapping hypotenuses.
- When the two red light indicator points overlap, it is the focal length position.
### 4. Automatic focusing system
1. **System installation**:
- Install the automatic focusing system on the laser marking machine, which usually includes a visual positioning system.
2. **Automatic focusing**:
- Automatic focusing marking is achieved through the visual positioning system, and the focal length can be automatically adjusted even if there is a slight difference in the thickness of the workpiece.
### Notes
- **Maintain consistency**: When adjusting the focal length, the same height value should be used to ensure that the laser focus is always on the surface of the workpiece.
- **Laser safety**: During operation, be sure to follow the safety operating procedures of the laser equipment, avoid looking directly at the laser, and ensure the safety of the operator.
- **Equipment differences**: Since laser marking machines of different brands and models may differ in design and operation, adjustments must be made according to the requirements of the specific equipment in actual operation.
In summary, adjusting the laser focal length requires comprehensive consideration of multiple factors and methods, and choosing the most suitable adjustment method according to the specific situation.
Q: How to select right working area
The right working area depends on your application:
Q: The basic process of laser marking machine
The basic process of laser marking machine proofing marking
1. **Equipment preparation**:
- Connect the laser marking machine to the power supply and computer, and ensure that the equipment is placed safely and reliably on the workbench.
- Install the necessary driver software or CAD drawing software for pattern design and marking control.
2. **Material preparation**:
- Select materials suitable for laser marking, such as metal, plastic, glass, etc., and ensure that the surface of the material is clean, flat and smooth.
- Pre-treat the material as needed, such as cleaning, drying, etc.
3. **Pattern design**:
- Use CAD software to design the pattern or text to be marked, including fonts, size, position and other elements.
- Make sure the designed pattern matches the size and shape of the material, and consider the clarity and beauty of the marking effect.
4. **Parameter adjustment**:
- In the laser marking software, adjust the laser power, speed, frequency and other parameters according to the type and thickness of the material.
- The adjustment of these parameters will directly affect the clarity and depth of the marking effect.
5. **Positioning and focus adjustment**:
- Place the material on the workbench and use the infrared auxiliary system or camera to locate the marking position.
- Adjust the laser focus to ensure that it is correctly aligned with the material surface to obtain the best marking effect.
6. **Start proofing**:
- After confirming that all settings are correct, start the laser marking machine for proofing.
- Observe the equipment operation status and marking effect during the proofing process to ensure that everything is normal.
7. **Effect inspection**:
- After the proofing is completed, check whether the clarity, depth and quality of the mark meet the requirements.
- If necessary, adjust the parameters according to the inspection results and re-proof.
Q: Precautions for laser marking machine operation
1. **Safe operation**:
- During the proofing process or marking operation, be sure to follow the safety operating procedures and wear protective equipment such as protective glasses.
- Avoid direct contact with the laser beam to prevent accidents.
2. **Material selection**:
- Select suitable materials according to marking needs and understand the laser processing performance of the materials.
- Pay attention to the surface treatment and pretreatment requirements of the materials to ensure the marking effect.
3. **Parameter adjustment**:
- Parameter adjustment requires experience and skills. It is recommended to gradually explore and optimize in actual operation.
- Different materials and patterns may require different parameter settings to achieve the best marking effect.
4. **Equipment maintenance**:
- Regularly maintain and maintain the laser marking machine to ensure that it is in good working condition.
- Pay attention to cleaning dust and residues inside the equipment to avoid affecting the marking effect.
Q: What’s laser marking machine?
A: The laser marking machine, also regarded as a laser etching machine, is undoubtedly one of the best marking tools available. It can be applied to etch a wide range of materials and leave permanent marks on their surfaces. Laser marking technology produces high-quality and easy-to-read permanent marks which are reliable to manufacturers and customers. These marks are hardly damaged by these laser marking machines, even in extreme working conditions, such as vapors, high temperatures, etc. Compared with traditional marking methods, laser marking is a non-contact process along with lower operating costs and material costs. In addition, by means of a laser marker, some other useful information can be added to your products, including codes, serial numbers, and texts, etc.
Application:
The 20W machine is mainly used for surface marking of plastic, stainless steel, aluminum and so on.
If the customer wants to engrave deeply, then a 30W machine will be a better choice. For all materials, aluminum is the easiest to achieve deep engraving.
If you want to do deep marking on brass, silver, or gold or cut it, you need to choose the 50watt. As you know, these materials are high-reflective materials. If you choose the lower watt, the marking speed is low.
Q: Which Materials Can Be Laser Marked?
Q: How do i choose laser source?Fiber ,UV or CO₂ ?
A: Fiber laser is suitable for metal and some plastic,UV laser is suitable for plastic ,CO2 laser is suitable for wood,cloth,plastic, etc.
Q: 20W 30W 50W laser marking machine different
A: ① 30w is more durable than 20w , and 50w is more durable than 30w
② if marking same content on same materials, 50w marking speed is faster than 20w/ 30w
③ if marking same depth on same material, 50w marking time is shorter than 20w/ 30w
In brief, big power laser machine have greater efficiency.
Q: What’s the biggest marking area of laser marking machine
Small Working Area (50mm x 50mm to 100mm x 100mm)
Medium Working Area (150mm x 150mm to 200mm x 200mm)
Large Working Area (300mm x 300mm to 500mm x 500mm or more)
Q: What is the depth of laser mark?
A: A mark's depth depends on the laser marker type, the parameters used to create the mark and the target material.
For example, the depth of a single mark on plastic can be easily controlled and varied (from a few microns to over 1mm). However, metal marks are typically only 10-90 μm deep, so deep engraving takes much longer to accomplish.
Thus, a wide variety of marking styles are available by simply changing the laser power and marking speed.
Q: Do you accept sample marking test?
A: Yes, the sample test is free. If you have a marking request, please send the marking file in DXF/AI format and the sample to us. We will conduct free testing, share the marking cycle time and video with you, and return the sample for your review."
Q: How to choose corrent laser welding power
Q: Laser cutting machine operation
Q: When I received your machine ,but I don’t know how to use it,what should I do?
The training & technical support of LK Laser is as below:
1.Machine manual and Operation video will be provided with a machine.
2.Software manual will be provided in softcopy.
3.Initial parameters in the software will be set up so the machine is “ready to use”.
4.Online technical support requests will be Response within 1 hour during working time, we will guide you by email, telephone, or video chat.
5.Actually this laser marking machine is quite simple on an operation, most of our users can start to use the machine and learn well by themselves in a short time.
6.Engineer online technical support is available, visa, air tickets, accommodation, and local transportation fees will be on the client’s side. (Appointment needed )
Q: Payment methods
